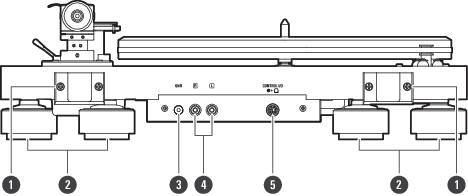
Turntable body
Top view

-
Motor pulley
-
Platter
-
Drive belt
-
Spindle
-
Tonearm
Rear view
-
Dust cover hinge holder
Attachment points for dust cover hinges.
-
Foot
Adjust the level of the product.
-
Ground (earth) terminal
Connect the amplifier’s ground (earth) terminal to this terminal using the ground cable.
-
Stereo output terminal
Connect the RCA audio cable. Connect to the PHONO input jack of the phono equalizer or amplifier with built-in phono equalizer. The red terminal is the right channel and the white terminal is the left channel.
-
Control unit connection terminal
Connect the control unit using the control cable.
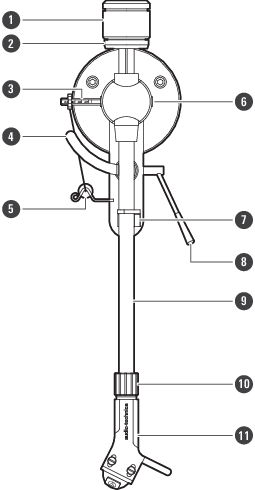
Tonearm
-
Counterweight
Balances the tonearm and adjusts to provide the proper tracking force. There are two counterweights with different weights. Attach the counterweight (light) if using the included cartridge. Attach the correct counterweight for the weight of the cartridge you are using. For details, see Choosing the correct counterweight.
-
Tracking force gauge ring
Use to adjust the tracking force.
-
Anti-skate bar
While the record is playing, a force acts on the stylus tip to pull it inward. This force can be counteracted by setting the weight for anti-skate for the tracking force value. Adjust the position where the weight for anti-skate is hooked to match the multiplier scale. For details, see Setting the anti-skate adjustment.
-
Tonearm lift
Moves the tonearm vertically to and from the face of the record.
-
Weight for anti-skate
This weight is for adjusting anti-skate. If using a cartridge other than the included cartridge, depending on the tracking force, it may be necessary to make adjustments by adding the auxiliary weight for anti-skate.
-
Tonearm height adjustment socket
For details, see Adjusting the tonearm’s height.
-
Tonearm rest with clamp
Use the clamp to secure the tonearm so that it does not move.
-
Tonearm lift control lever
Operates the tonearm lift.
-
Tonearm
-
Locking ring
Rotate the ring to the left (counterclockwise) to secure the headshell. To remove the headshell, rotate the ring to the right.
-
Headshell and cartridge
The cartridge is attached to the headshell.