Using the product
- Connecting to and using an audio interface is explained as an example.
- Refer to the user manual of the audio interface to be connected and use it properly.
- An audio interface that has a microphone input (balanced input) compatible with a phantom power supply is required to use the microphone of the product. Check the specifications of the audio interface to be connected.
- When connecting to a device other than an audio interface (mixer, etc.), refer to the device's user manual for proper connection and use.
-
Make sure the audio interface is not turned on.
- Make sure phantom power is turned off.
- Make sure the microphone gain and headphone volume are set to minimum. Sudden loud noise emitted from the product may cause damage to the product or hearing damage.
-
Connect the 3.5 mm (1/8”) gold-plated stereo 3-pole mini-plug to the headphone jack on the audio interface.
-
Connect the XLR-M connector (3-pin) to the XLR jack on the audio interface.
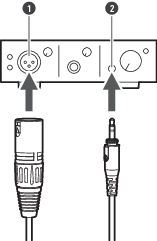
- XLR jack
- Headphone jack
-
Use the USB cable to connect the audio interface to a computer.

- USB cable (included with audio interface)
-
Make sure the audio interface is turned on, and turn phantom power ON.
-
Place the product with the side marked “L” on your left ear and the side marked “R” on your right ear, and adjust the headband length by sliding the slider.
-
Adjust the microphone near the corner of your mouth.
-
Operate the audio interface and adjust the microphone gain and headphone volume.
|
|
|
|---|