Monitoring devices
Adding a monitor
Monitors a device selected from the device list.
- This procedure cannot be used on the “Online Device(s)” screen.
-
Click the import button on the “Monitor” screen.

-
Select the device and channels to monitor.
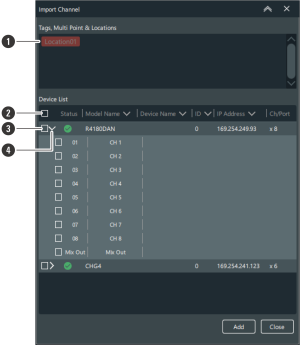
- You can filter the displayed devices with the tags and location.
- Selects/clears the selection of all the channels.
- Selects the device/channel to add.
- Opens the device list. After opening this list, you can select the channels.
-
Click “Add”.
The selected device/channel monitor is added to the “Monitor” screen.
-
Click “Close” to close the “Import Channel” screen.
|
|
|
|---|
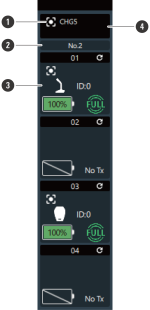
How to read the receiver monitor

-
Device identifier
Identifies connected devices. Click the icon to make the indicator lamp of the corresponding device flash.
-
Channel
Displays the channel name and number.
-
Tx
Displays the device name, device ID, gain, battery level, usable time of the linked transmitter, and mute state. You can right-click this area to open the device settings of the transmitter.
The battery level percentage is not displayed when the device is being charged via USB. -
RF
Displays the “RF Power” setting and the RF level. You can right-click this area to open the device settings of the receiver.
-
Audio
Displays the off status of the high-pass filter, the cutoff frequency, and the receiver audio level. You can right-click this area to open the device settings of the receiver.
-
Setting status
Displays the preset name, RF mode, and roaming settings.
-
Display size selector
Click this area to switch the display size.
-
Model name
Displays the model name of the receiver.
|
|
|
|---|
How to read the charging station monitor
-
Device identifier
Identifies connected devices. Click the icon to make the indicator lamp of the corresponding device flash.
-
Charging station number
Displays the charging station number. When charging stations are linked together, numbers are assigned in order starting from the charging station to which the AC adapter is connected.
-
Charging status
Displays the port number of the charging station as well as the device name, device ID, and charging status of the transmitter along with the time until it finishes charging. You can right-click this area to open the device settings of the transmitter or charging station. Right-click the battery mark to display the “Battery Cycle”, “Battery Health”, and “Temperature”.
Battery Cycle: The count is incremented after the battery is charged to a certain level.
Battery Health: Degree of battery deterioration
Temperature: Battery temperature during charging -
Model name
Displays the model name of the charging station.
|
|
|
|---|
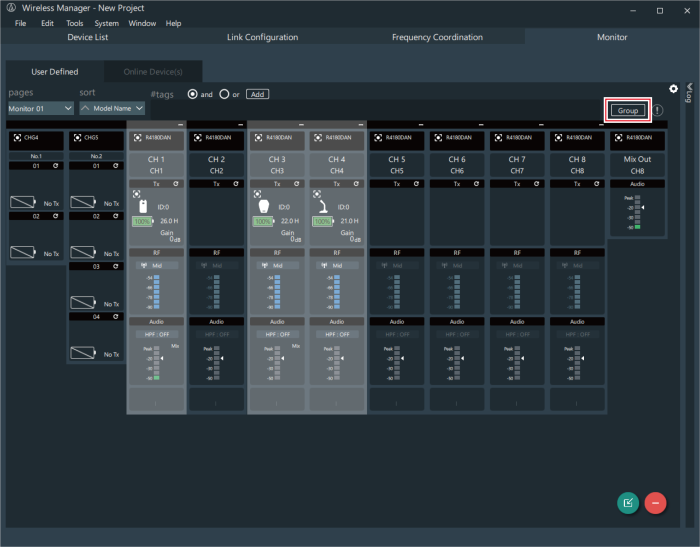
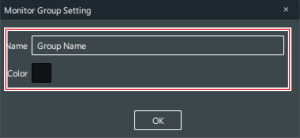
Grouping monitors together
You can group monitors together and assign names and colors to the groups.
- This procedure cannot be used on the “Online Device(s)” screen.
-
While holding down the Ctrl key or the command key, click the monitors to group together.
-
Click “Group” or right-click one of the selected monitors.
-
Enter the group name and select the color.
-
Click “OK”.
The selected monitors are grouped together.
|
|
|
|---|
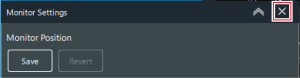
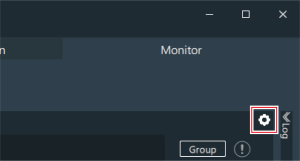
Configuring monitor settings
You can set how monitors are displayed.
- This procedure cannot be used on the “Online Device(s)” screen.
-
Click the part indicated with the red frame.
-
Configure the monitor settings.
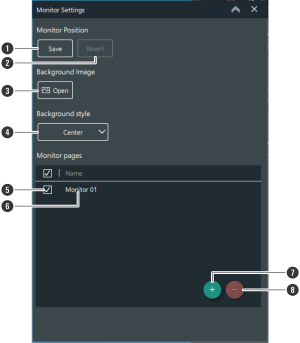
- Saves the current position.
- Reverts to the saved position.
- Select the image file displayed in the background of the monitor. Click “×” to delete the displayed background image.
- Sets how the background image is displayed.
Center: The background image is displayed with its original size.
Stretch: The background image is stretched to match the size of the screen.
Tile: Multiple instances of the background image in its original size are displayed as tiles. - You can use “pages” on the “User Defined” screen to switch between the monitor pages selected with the check box.
- Click the text to change the page name.
- Adds a monitor page.
- Deletes the selected monitor page.
-
Close the “Monitor Settings” screen by clicking the part indicated with the red frame.