Updating the firmware
Use this procedure to update the firmware of the receiver, charging station, and transmitter to the latest version.
-
On the menu, click “Tools” -> “Firmware Update”.
The Wireless Firmware Update Tool will launch.
|
|
|
|---|
Downloading the firmware
Find and download available firmware updates for each device.
-
Current download statuses are displayed.
- Click “Download” or “Install” to switch between the two tabs.
- The latest firmware version for each device is displayed.
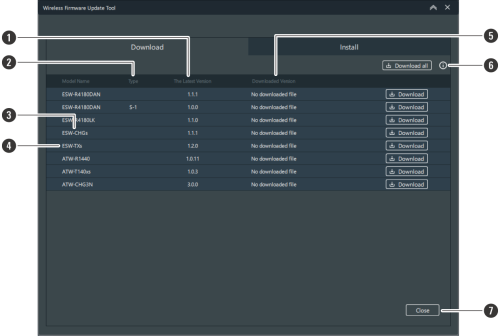
- Displays the latest firmware version.
- Displays a signifier to distinguish between different model types. Check the type of the device you are using.
- This is common firmware for charging stations.
- This is common firmware for transmitters.
- Displays previously downloaded firmware versions.
- Click the icon to connect to our company website and display information about the latest firmware.
- Click the button to close the “Wireless Firmware Update Tool” screen.
-
Click “Download all” or “Download”.
- These can be clicked if an updated version is available.
- Click “Download all” to download firmware for all devices at once.
- Click “Download” to download firmware for individual devices.
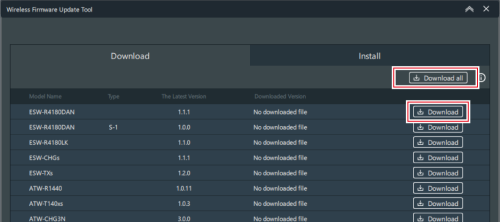
The firmware download will start. Please wait until the download is complete.
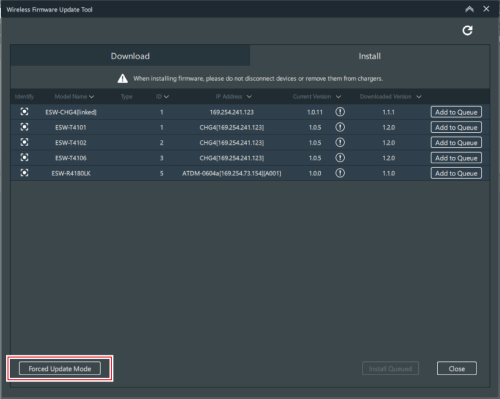
Installing the firmware
Install the downloaded firmware to the device.
-
Current installation statuses are displayed.
- Click “Download” or “Install” to switch between the two tabs.
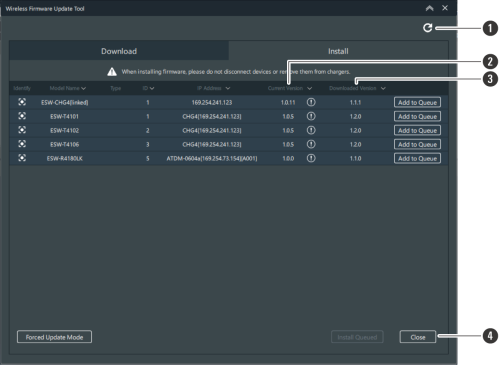
- Click the icon to refresh the display.
- Displays the current firmware version of the device.
- Displays downloaded firmware versions.
- Click the button to close the “Wireless Firmware Update Tool” screen.
-
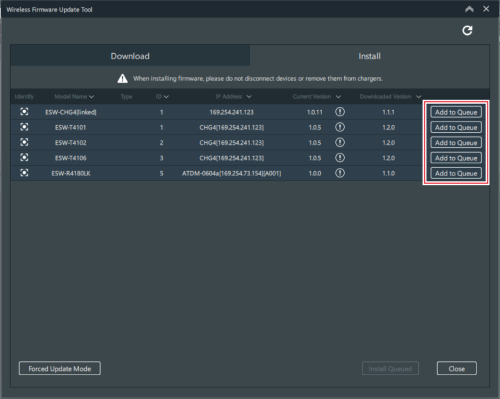
Select devices to install the firmware by clicking “Add to Queue”.
-
Click “Install Queued”.
-
Click “OK”.
Firmware installation will start. Perform the installation by following the on-screen instructions.
-
Installation results will be displayed once installation is complete.
- If “Error” is displayed, the installation has failed. If the “Retry” button is enabled, restart the firmware installation. If the “Retry” button is disabled, a malfunction may have occurred. In this situation, contact your local Audio-Technica dealer.
- If “Missing” is displayed, the installation has failed. Make sure that the network is connected properly. Also make sure that the transmitter has been inserted properly into the charging station. If the info icon is displayed next to “Missing”, also check this icon. After checking all these items, click the update button in the upper-right corner of the screen to carry out the installation again. Perform a forced update if the device cannot be detected. If the firmware update process is interrupted, “Unknown Tx” may appear as the model name for the transmitter. This is normal, so please reinstall the update.
|
|
|
|---|
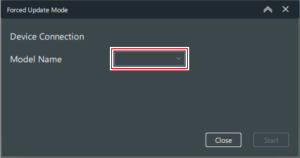
When firmware installation fails and the device is not detected (forced update mode)
If firmware installation fails, the device may not be detected by Wireless Manager. However, running forced update mode in this situation will enable the device to be detected.
-
Set the IP address of the PC to the same segment other than “192.168.0.20/24”.
- If the firmware installation fails, the failed device will start up on “192.168.0.20/24”. Therefore, the PC must be set to the same segment other than “192.168.0.20/24”.
- It is necessary to manually switch the charging station to forced update mode. With the charging station off, press and hold its reset button and turn it on. Continue to hold down the reset button (for approximately 10 seconds) and release it when the power indicator lamp flashes in blue. The charging station switches to forced update mode.
-
On the “Wireless Firmware Update Tool” screen, click “Forced Update Mode”.
-
Select a device.
- When a connection with the device is established, “Established” is displayed for “Device Connection”.
-
Click “Start”.
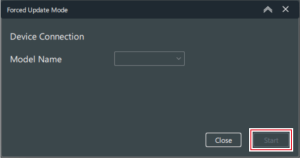
Forced update mode will start.
-
Once forced update mode finishes, click “Close”.
- If an error occurs, restart forced update mode.
-
Restart firmware installation.
- Refer to Installing the firmware for details.