ESW-T4106/ESW-T4107
Turning the device on/off
-
With the device off, press and hold (approximately 2 seconds) the power button.
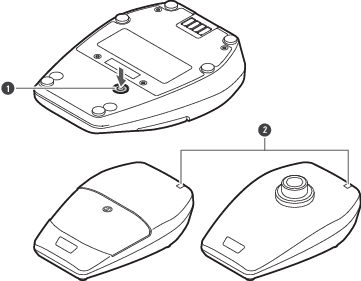
- Power button
- Status indicator lamp
The device turns on. When the link with the receiver is established, the status indicator lamp lights.
-
With the device on, press and hold the power button for approximately 2 seconds, and then release the button.
The device turns off.
|
|
|
|---|
Switching between muted and unmuted
-
Quickly press the talk switch.
- The device switches between muted and unmuted each time this button is quickly pressed.
- You can change this setting with “Mute Mode” under “Device Setting”. Refer to Wireless Manager device settings for details on “Device Setting”.
- The talk indicator lamp and the status indicator lamp light.
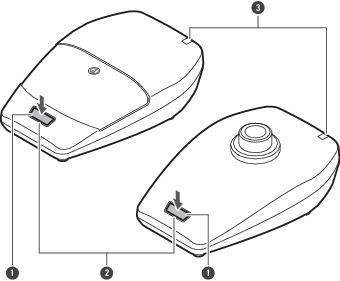
- Talk switch
- Talk indicator lamp
- Status indicator lamp
Indicator lamp display Operation status Lit in red Muted Lit in green Unmuted - You can change the display color with “Mute LED Color” or “Unmute LED Color” under “Device Setting”. Refer to Wireless Manager device settings for details on “Device Setting”.
Checking the battery level
-
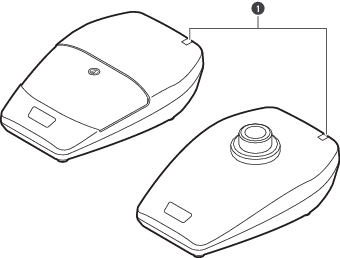
With the device on, press and hold (approximately 5 seconds) the power button.
- The status indicator lamp flashes.
- Power button
- Status indicator lamp
Status indicator lamp display Battery level Flashing in green (one time) 0% to less than 25% Flashing in green (two times) 25% to less than 50% Flashing in green (three times) 50% to less than 75% Flashing in green (four times) 75% or more
Battery level alert
If the battery level drops too low, the status indicator lamp flashes. Charge the battery.
- Status indicator lamp
| Status indicator lamp display | Battery level alert |
|---|---|
| Flashing in orange | There is no battery power. The device will turn off within 30 minutes. [1] |
| Flashing in the color the lamp lights in when the device is muted/unmuted | The battery level is low. The device will turn off within 60/90/120 minutes. [1][2] |
[1] The time is a guideline. It varies depending on usage conditions.
[2] This function is turned off with the factory default settings. You can set the time to 60/90/120 minutes with “Battery Alert” under “Device Setting”. Refer to Wireless Manager device settings for details on “Device Setting”.
Checking the directionality of the microphone (ESW-T4106 only)
-
Quickly press the power button.
- The status indicator lamp flashes.
- Power button
- Status indicator lamp
Status indicator lamp display Directionality of the microphone Flashing in blue (three times) Cardioid Flashing in white (three times) Omnidirectional - You can change this setting with “Polar Pattern” under “Device Setting”. Refer to Wireless Manager device settings for details on “Device Setting”.
How to attach a gooseneck microphone (ESW-T4107 only)
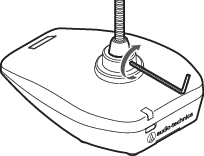
To use a gooseneck microphone, attach it to a desk stand transmitter.
-
Rotate the gooseneck microphone clockwise while inserting it into the desk stand transmitter.
- Tighten until the gooseneck microphone stops turning.

-
Use a hexagonal wrench to tighten the fixing screw, fixing the gooseneck microphone in place on the desk stand transmitter.
|
|
|
|---|