Channel settings
Basic operation
-
Press the CH MENU button.
- Each press of the CH MENU button switches the channel to set.
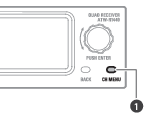
- CH MENU button
The channel settings menu appears.
-
Turn the control dial to select the channel settings menu and setting.
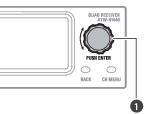
- Control dial
-
Press the control dial to confirm the selection.
-
Press the BACK button to go back one screen.
- If a setting is being configured, it will be canceled.
- Press and hold (approximately 2 seconds) to return to the main screen.
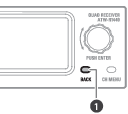
- BACK button
|
|
|
|---|
Channel settings menu list
| Channel settings menu | Details | |
|---|---|---|
| PAIR | Pair with a transmitter. | |
| LINE/MIC | Set the LINE/MIC level. | |
| LEVEL | Set the output level. | |
| HPF | Set HPF (High-Pass Filter). | |
| TX SETTING[1] | TX ID | Set the transmitter ID. |
| GAIN | Set the transmitter input gain. | |
| INPUT[2] | Set the connection destination of the input connector. | |
| MUTE MODE | Set the mute mode. | |
| LED | Set the indicator lamp display. | |
| BATTERY[3] | Set the type of batteries used. | |
| TIMEOUT | Set the timeout time. | |
| VERSION | Display the version of the transmitter. | |
| RESET | Set the transmitter to the factory defaults. | |
| UTILITIES | EQ | Set the equalizer. |
| COMPRESSOR | Set the compressor. | |
| MULTI TX ID[4] | Delete the transmitter registration. | |
| IDENTIFY[1] | Make the indicator lamp flash on the device being communicated with. | |
[1] This can be set when communication is established with a transmitter and this transmitter is on.
[2] This setting is only possible on the ATW-T1401.
[3] This setting is only possible on the ATW-T1401/ATW-T1402.
[4] This can be set when multipairing is set to “On”.
Pairing mode
-
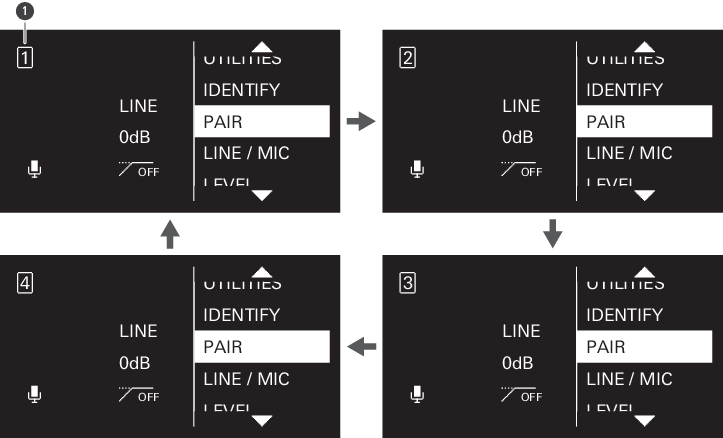
Press the CH MENU button to select the channel to set.
- Each press of this button switches the channel to set.
-
Channel
-
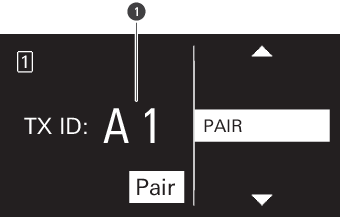
Turn the control dial to select “PAIR” and press the control dial.
-
Turn the control dial to select the character to set to the transmitter ID, and then press the control dial.
- You can set two characters from A to Z and from 0 to 9.
-
Transmitter ID
-
Turn the control dial to select “Pair” and press the control dial.
“Pairing” appears on the display of the receiver, and pairing with the transmitter starts.
|
|
|
|---|
Setting the LINE/MIC level
-
Press the CH MENU button to select the channel to set.
- Each press of this button switches the channel to set.
-
Turn the control dial to select “LINE/MIC” and press the control dial.
-
Turn the control dial to select “LINE”/“MIC” and press the control dial.
The setting is complete.
Setting the output level
-
Press the CH MENU button to select the channel to set.
- Each press of this button switches the channel to set.
-
Turn the control dial to select “LEVEL” and press the control dial.
-
Turn the control dial to select the output level to use and press the control dial.
- The level changes +/− 1 dB each time you turn the control dial.
- It can be set from −20 to +20 dB.
The setting is complete.
Setting the HPF (High-Pass Filter)
-
Press the CH MENU button to select the channel to set.
- Each press of this button switches the channel to set.
-
Turn the control dial to select “HPF” and press the control dial.
-
Turn the control dial to select “ON”/“OFF” and press the control dial.
The setting is complete.
Setting the transmitter ID
-
Press the CH MENU button to select the channel to set.
- Each press of this button switches the channel to set.
-
Turn the control dial to select “TX SETTING” and press the control dial.
-
Turn the control dial to select “TX ID” and press the control dial.
-
Turn the control dial to select the character, and then press the control dial.
- You can set two characters from 0 to 9 and from A to Z.
The setting is complete.
Setting the input gain
-
Press the CH MENU button to select the channel to set.
- Each press of this button switches the channel to set.
-
Turn the control dial to select “TX SETTING” and press the control dial.
-
Turn the control dial to select “GAIN” and press the control dial.
-
Turn the control dial to select the input gain to use and press the control dial.
- The gain changes +/− 2 dB each time you turn the control dial.
- It can be set from −10 to +20 dB.
The setting is complete.
Setting the input connector (ATW-T1401 only)
Set the connection destination of the input connector to “MIC” (microphone) or “INST” (guitar cable, etc.).
-
Press the CH MENU button to select the channel to set.
- Each press of this button switches the channel to set.
-
Turn the control dial to select “TX SETTING” and press the control dial.
-
Turn the control dial to select “INPUT” and press the control dial.
-
Turn the control dial to select “MIC”/“INST” and press the control dial.
The setting is complete.
Setting the mute mode (ATW-T1401/ATW-T1402)
-
Press the CH MENU button to select the channel to set.
- Each press of this button switches the channel to set.
-
Turn the control dial to select “TX SETTING” and press the control dial.
-
Turn the control dial to select “MUTE MODE” and press the control dial.
-
Turn the control dial to select “Enable”/“Disable” and press the control dial.
Item Details Enable The device switches between muted and unmuted to match the side that the mute switch is slid to. Disable The device is not muted even if the mute switch is slid to that side. The setting is complete.
Setting the mute mode (ATW-T1406/ATW-T1407)
-
Press the CH MENU button to select the channel to set.
- Each press of this button switches the channel to set.
-
Turn the control dial to select “TX SETTING” and press the control dial.
-
Turn the control dial to select “MUTE MODE” and press the control dial.
-
Turn the control dial to select “Toggle” / “Touch to talk” / “Touch to mute” / “Disable” and press the control dial.
-
If you selected “Toggle”, turn the control dial to select “Default mute” / “Default unmute” and press the control dial.
Item Details Default mute The device starts muted when it turns on. The device switches between muted and unmuted each time the talk switch is quickly pressed. Default unmute The device starts unmuted when it turns on. The device switches between muted and unmuted each time the talk switch is quickly pressed. Touch to talk The device is unmuted while the talk switch is pressed. Touch to mute The device is muted while the talk switch is pressed. Disable The device is not muted even if the talk switch is pressed. The setting is complete.
Setting the indicator lamp (ATW-T1401/ATW-T1402)
You can change the lighting setting of the displayed indicator lamp.
-
Press the CH MENU button to select the channel to set.
- Each press of this button switches the channel to set.
-
Turn the control dial to select “TX SETTING” and press the control dial.
-
Turn the control dial to select “LED” and press the control dial.
-
Turn the control dial to select “On”/“Off” and press the control dial.
Item Details On The indicator lamp lights. Off The indicator lamp is always off. The setting is complete.
Setting the indicator lamp (ATW-T1406/ATW-T1407)
You can change the color setting of the displayed indicator lamp.
- With the ATW-T1407, configure this setting when using a gooseneck microphone with an LED.
- When using a gooseneck microphone with no LED, select “Standard”.
- When using a gooseneck microphone with an LED, select “Conference”.
-
Press the CH MENU button to select the channel to set.
- Each press of this button switches the channel to set.
-
Turn the control dial to select “TX SETTING” and press the control dial.
-
Turn the control dial to select “LED” and press the control dial.
-
Turn the control dial to select “Standard”/“Conference” and press the control dial.
Item Details Standard When unmuted: Green
When muted: RedConference When unmuted: Red
When muted: OffThe setting is complete.
|
|
|
|---|
Setting the battery type (ATW-T1401/ATW-T1402 only)
Set the type of batteries used.
-
Press the CH MENU button to select the channel to set.
- Each press of this button switches the channel to set.
-
Turn the control dial to select “TX SETTING” and press the control dial.
-
Turn the control dial to select “BATTERY” and press the control dial.
-
Turn the control dial to select “Alkaline”/“NiMH”/“Lithium” and press the control dial.
Item Details Alkaline Select when using alkaline batteries. NiMH Select when using nickel–metal hydride batteries. Lithium Select when using lithium batteries. The setting is complete.
|
|
|
|---|
Setting the timeout
Set the timeout time when searching for the receiver to communicate with. If a timeout occurs, the transmitter turns off.
-
Press the CH MENU button to select the channel to set.
- Each press of this button switches the channel to set.
-
Turn the control dial to select “TX SETTING” and press the control dial.
-
Turn the control dial to select “TIMEOUT” and press the control dial.
-
Turn the control dial to select “Off”/“1min”/“10min”/“60min” and press the control dial.
The setting is complete.
Checking the version
Display the version of the transmitter firmware.
-
Press the CH MENU button to select the channel to set.
- Each press of this button switches the channel to set.
-
Turn the control dial to select “TX SETTING” and press the control dial.
-
Turn the control dial to select “VERSION”.
The firmware version appears.
Resetting
Set the transmitter settings to the factory defaults.
- The receiver’s transmitter information will not be deleted.
-
Press the CH MENU button to select the channel to set.
- Each press of this button switches the channel to set.
-
Turn the control dial to select “TX SETTING” and press the control dial.
-
Turn the control dial to select “RESET” and press the control dial.
-
Select “Yes” and press the control dial.
-
Select “Yes” and press the control dial.
The settings are reset.
Setting the equalizer
You can use the dedicated software (Wireless Manager) to configure more detailed settings.
-
Press the CH MENU button to select the channel to set.
- Each press of this button switches the channel to set.
-
Turn the control dial to select “UTILITIES” and press the control dial.
-
Turn the control dial to select “EQ” and press the control dial.
-
Turn the control dial to select “EQ:” and press the control dial.
-
Turn the control dial to select “On” and press the control dial.
You can now select the equalizer setting.
-
Turn the control dial to select “Recall preset:” and press the control dial.
-
Turn the control dial to select “NEUTRAL”/“WARM”/“BRIGHT”/“USER1”/“USER2”/“USER3”/“USER4” and press the control dial.
- Use the dedicated software (Wireless Manager) to set “USER1”/“USER2”/“USER3”/“USER4”.
The setting is complete.
Setting the compressor
You can use the dedicated software (Wireless Manager) to configure more detailed settings.
-
Press the CH MENU button to select the channel to set.
- Each press of this button switches the channel to set.
-
Turn the control dial to select “UTILITIES” and press the control dial.
-
Turn the control dial to select “COMPRESSOR” and press the control dial.
-
Turn the control dial to select “COMP:” and press the control dial.
-
Turn the control dial to select “On” and press the control dial.
You can now select the compressor setting.
-
Turn the control dial to select “Recall preset:” and press the control dial.
-
Turn the control dial to select “VOCAL”/“SPEECH”/“USER1”/“USER2”/“USER3”/“USER4” and press the control dial.
- Use the dedicated software (Wireless Manager) to set “USER1”/“USER2”/“USER3”/“USER4”.
The setting is complete.
Deleting transmitter registration
You can delete the registration of the paired transmitter.
- This is displayed when multipairing is set to “On”.
- The transmitter’s receiver information will not be deleted.
-
Press the CH MENU button to select the channel to set.
- Each press of this button switches the channel to set.
-
Turn the control dial to select “UTILITIES” and press the control dial.
-
Turn the control dial to select “MULTI TX ID” and press the control dial.
-
Turn the control dial to select the ID of the registration to delete and press the control dial.
- Each press of this button selects or clears the check box.
-
Turn the control dial to select “Delete” and press the control dial.
The registration of the channel with the selected check box is deleted.
Checking the communicating device
-
Press the CH MENU button to select the channel to set.
- Each press of this button switches the channel to set.
-
Turn the control dial to select “IDENTIFY” and press the control dial.
For a set period of time, the indicator lamp of the transmitter with which communication has been established lights alternately between red, green, and yellow.