Receiver settings
Basic operation
-
Press the control dial.
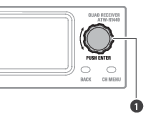
- Control dial
The receiver settings menu appears.
-
Turn the control dial to select the receiver settings menu and setting.
-
Press the control dial to confirm the selection.
-
Press the BACK button to go back one screen.
- If a setting is being configured, it will be canceled.
- Press and hold (approximately 2 seconds) to return to the main screen.
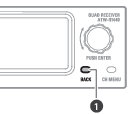
- BACK button
|
|
|
|---|
Receiver settings menu list
| Receiver settings menu | Details | |
|---|---|---|
| DEVICE ID | Set the device ID. | |
| NAME | Set the name. | |
| RF MODE | Set the reception mode. | |
| UTILITIES | AUTO LOCK | Set this function to prevent the settings from being changed. |
| OUTPUT MIX | Set whether to mix and output audio. | |
| AF METER | Switch the level meter on the main screen to the meter of the receiver or transmitter. | |
| MULTI TX | You can use this setting to register up to four transmitters to each receiver channel. | |
| CTRL DIAL | Change the rotation direction of the control dial. | |
| PRESET | Save the settings. Or load saved settings. | |
| RESET | Set the receiver to the factory defaults. | |
| VERSION | Display the version of the receiver. | |
| WEB MANUAL | Display a 2D code for the manual. | |
| NETWORK | IP SETTING[1] | Set the IP. |
| REMOTE CTRL[1] | Set the remote control. | |
| SYSLOG[1] | Set whether to send the log message to the Syslog server. | |
| DISCOVERY[1] | Set automatic detection by the software. | |
| NTP[1] | Set the NTP (Network Time Protocol). | |
| MAC ADDRESS | Display the MAC address. | |
[1] When receivers are RX linked, the expansion unit receiver cannot be set.
Setting the device ID
-
From the receiver settings menu, select “DEVICE ID” and press the control dial.
-
Turn the control dial to select the number, and then press the control dial.
- It can be set from 0 to 999.
The setting is complete.
Setting the name
Set the receiver’s name. The following characters can be entered:
- Alphabetic characters (uppercase letters), numbers, symbols (_, +, −, #, &, period), spaces
- The number of characters that can be entered is 8.
-
From the receiver settings menu, select “NAME” and press the control dial.
-
Turn the control dial, select the desired character, and then press the control dial.
- The character is input, and the cursor moves.
-
Repeat the operation in step 2 to enter all characters.
-
Select “End” and press the control dial.
The setting is complete.
Setting the reception mode
- The default setting is “Standard”.
- “Standard” is a low-latency mode.
- In “HD Mode”, lowering the transmission rate of the audio to narrow the occupied bandwidth of the radio wave enables simultaneous operation on multiple channels more than when “Standard” is selected.
- “Standard” allows for reception on two channels. “HD mode” allows for reception on four channels.
- Changing the reception mode deletes the pairing information.
- When receivers are RX linked, changing this setting on the base unit changes the setting on the expansion unit to match.
- When receivers are RX linked, the expansion unit cannot be set. The current mode is displayed.
-
From the receiver settings menu, select “RF MODE” and press the control dial.
-
Turn the control dial to select “Standard” / “HD mode” and press the control dial.
-
Select “OK” and press the control dial.
The setting is complete.
Setting the lock
Set this function to prevent the receiver settings from being changed.
- The default setting is “Off”.
- Setting this to “On” makes operation impossible. To change the settings, unlock the receiver.
-
From the receiver settings menu, select “UTILITIES” and press the control dial.
-
Turn the control dial to select “AUTO LOCK” and press the control dial.
-
Select “On”/“Off” and press the control dial.
The setting is complete.
Unlocking the receiver
To operate a locked receiver, unlock it.
- The receiver will be locked again if no operations occur for approximately 10 seconds.
-
With the receiver locked, press and hold (approximately 2 seconds) the control dial.
-
Turn the control dial to select “Yes” and press the control dial.
The receiver is unlocked.
Setting the mix output
You can output mixed audio from the AF balanced output connector 4/MIX.
- The default setting is “Discrete”. The audio of the transmitter connected to channel 4 is output.
- Select “Mix” to output a mix of the audio from the transmitters connected to channels 1 to 4.
- You can use the dedicated software (Wireless Manager) to configure more detailed settings.
-
From the receiver settings menu, select “UTILITIES” and press the control dial.
-
Turn the control dial to select “OUTPUT MIX” and press the control dial.
-
Turn the control dial to select “Discrete”/“Mix” and press the control dial.
-
If you selected “Mix”, turn the control dial to select “Line”/“Mic” and press the control dial.
The setting is complete.
Setting the level meter display
Switch the AF status on the main screen to the “Pre” meter (the received audio signal level) or “Post” meter (the output level of the receiver).
- The default setting is “Pre”.
- Changing this setting changes the mark in the AF status part.
-
From the receiver settings menu, select “UTILITIES” and press the control dial.
-
Turn the control dial to select “AF METER” and press the control dial.
-
Turn the control dial to select “Pre”/“Post” and press the control dial.
The setting is complete.
Setting multipairing
You can pair multiple transmitters to a single channel. This function allows you to immediately switch to a different transmitter when the battery of the one in use dies or when you want to change the type of transmitter.
- The default setting is “Off”.
- Select “On” to pair up to four transmitters to a single channel.
-
From the receiver settings menu, select “UTILITIES” and press the control dial.
-
Turn the control dial to select “MULTI TX” and press the control dial.
-
Turn the control dial to select “On”/“Off” and press the control dial.
The setting is complete.
Setting the control dial
You can invert the direction of the operation performed when the control dial is turned.
- The default setting is “Default”.
-
From the receiver settings menu, select “UTILITIES” and press the control dial.
-
Turn the control dial to select “CTRL DIAL” and press the control dial.
-
Turn the control dial to select “Default”/“Invert” and press the control dial.
The setting is complete.
Saving presets
You can save the receiver settings.
-
From the receiver settings menu, select “UTILITIES” and press the control dial.
-
Turn the control dial to select “PRESET” and press the control dial.
-
Turn the control dial to select “Save as preset” and press the control dial.
-
Turn the control dial to select “Yes” and press the control dial.
The settings are saved.
Loading presets
Load settings that have been saved with the procedure under “Saving presets”.
-
From the receiver settings menu, select “UTILITIES” and press the control dial.
-
Turn the control dial to select “PRESET” and press the control dial.
-
Turn the control dial to select “Recall preset”.
-
Turn the control dial to select “Yes” and press the control dial.
-
Turn the control dial to select “Yes” and press the control dial.
The settings are loaded.
Resetting
Reset receiver settings to factory defaults.
-
From the receiver settings menu, select “UTILITIES” and press the control dial.
-
Turn the control dial to select “RESET” and press the control dial.
-
Turn the control dial to select “Yes” and press the control dial.
-
Turn the control dial to select “Yes” and press the control dial.
The settings are reset.
Checking the version
Display the version of the receiver firmware.
-
From the receiver settings menu, select “UTILITIES” and press the control dial.
-
Turn the control dial to select “VERSION” and press the control dial.
The firmware version appears.
Manual
Display a 2D code for the manual.
-
From the receiver settings menu, select “UTILITIES” and press the control dial.
-
Turn the control dial to select “WEB MANUAL” and press the control dial.
The 2D code appears.
IP settings
-
From the receiver settings menu, select “NETWORK” and press the control dial.
-
Turn the control dial to select “IP SETTING” and press the control dial.
-
Select an item you want to set and press the control dial.
Item Details IP Mode Set how to obtain IP addresses.
“Auto”: IP addresses are automatically assigned.
“Static”: The specified static IP addresses are used.IP Address[1] Specify the static IP address. Subnet Mask[1] Set the subnet mask. Gateway[1][2] Set the gateway. Port Number Displays the port number. [1] This item can be set only when “IP Mode” is set to “Static”.
[2] Depending on the purchase region, this setting may not be available.
-
Set each item.
-
Select “Apply” and press the control dial.
-
Turn the control dial to select “Reboot”/“Later” and press the control dial.
- If you selected “Reboot”, the receiver restarts to complete the setting.
- If you selected “Later”, the setting is complete but is not applied until the receiver restarts.
Setting the remote control
-
From the receiver settings menu, select “NETWORK” and press the control dial.
-
Turn the control dial to select “REMOTE CTRL” and press the control dial.
-
Select an item you want to set and press the control dial.
Item Details Notification Set to receive notifications from the receiver during remote control. LVL Notify[1] Set whether to include AF and RF levels in notifications from the receiver during remote control. Multicast IP[1] Set the address for multicast. Multicast port[1] Set the port number for multicast. [1] This can be set only when “Notification” is set to “ON”.
-
Set each item.
-
Select “Apply” and press the control dial.
The setting is complete.
Log message setup
Set whether to send the log message to the Syslog server.
- The default setting is “Off”.
-
From the receiver settings menu, select “NETWORK” and press the control dial.
-
Turn the control dial to select “SYSLOG” and press the control dial.
-
Turn the control dial to select “On”/“Off” and press the control dial.
The setting is complete.
|
|
|
|---|
Setting automatic detection by the software
- The default setting is “On”.
-
From the receiver settings menu, select “NETWORK” and press the control dial.
-
Turn the control dial to select “DISCOVERY” and press the control dial.
-
Turn the control dial to select “On”/“Off” and press the control dial.
-
Turn the control dial to select “Reboot”/“Later” and press the control dial.
- If you selected “Reboot”, the receiver restarts to complete the setting.
- If you selected “Later”, the setting is complete but is not applied until the receiver restarts.
Setting the NTP (Network Time Protocol)
Set the NTP.
-
From the receiver settings menu, select “NETWORK” and press the control dial.
-
Turn the control dial to select “NTP” and press the control dial.
-
Select an item you want to set and press the control dial.
Item Details NTP Set whether to enable or disable the NTP. Server Adrs[1] Set the NTP server address. Port Number[1] Set the NTP port number. Time Zone[1] Set the time difference from the UTC (Coordinated Universal Time). DST[1] Turn on/off daylight saving time. Start Date[2] Set the starting date of daylight saving time. Start Time[2] Set the starting time of daylight saving time. End Date[2] Set the ending date of daylight saving time. End Time[2] Set the ending time of daylight saving time. [1] This can be set only when “NTP” is set to “ON”.
[2] This can be set only when “DST” is set to “ON”.
-
Set each item.
-
Select “Apply” and press the control dial.
The setting is complete.
Checking the MAC address
-
From the receiver settings menu, select “NETWORK” and press the control dial.
-
Turn the control dial to select “MAC ADDRESS” and press the control dial.
The MAC address appears.