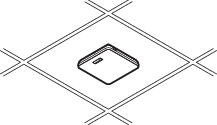
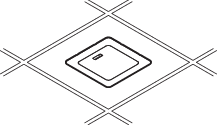
Grid ceiling installation
Surface mounting
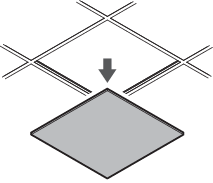
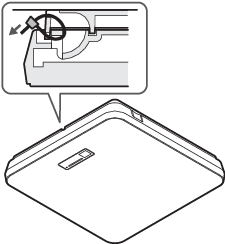
Completed installation
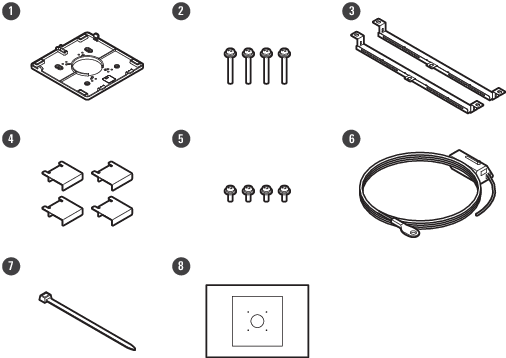
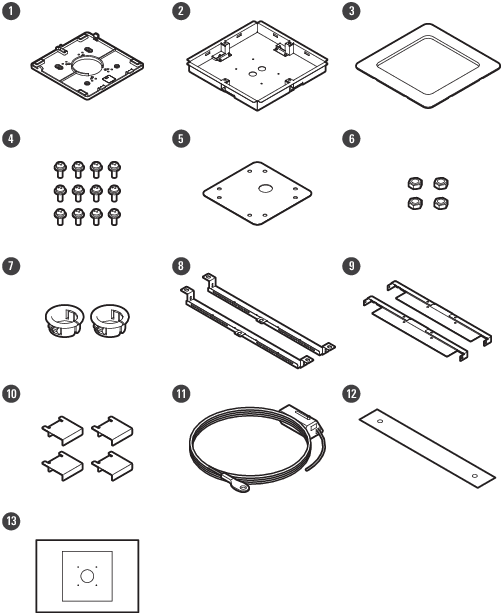
Parts required for installation
-
Surface mount adapter
-
Screw (M4 × 50 mm) × 4
-
Tile bridge A × 2
-
Tile bridge C × 4
-
Screw (M4 × 10 mm) × 4
-
Seismic cable
-
Zip tie
-
Installation template
-
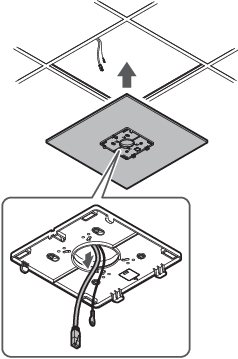
Remove the ceiling tile where the microphone will be installed.
-
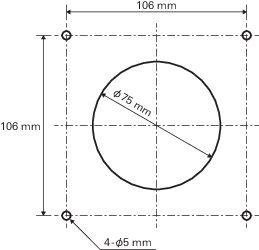
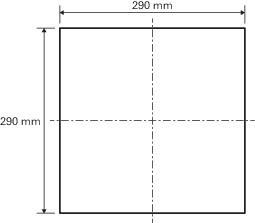
Drill holes in the ceiling tile for attaching the microphone.
-
Use the enclosed installation template to drill mounting holes according to the specified dimensions.
-
Align the mounting holes with the center of the ceiling tile.
-
-
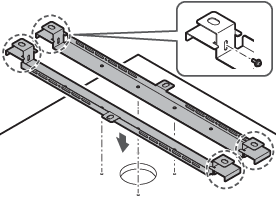
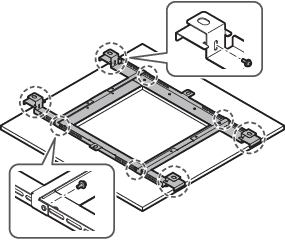
Attach tile bridges A behind the ceiling tile.
Attach tile bridges C loosely to tile bridges A using the screws (M4 × 10 mm).-
Align the screw holes of tile bridges A with the holes drilled into the ceiling tile to attach.
-
-
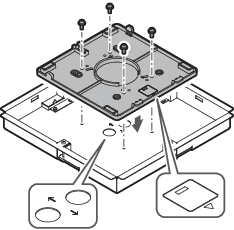
Attach the surface mount adapter using the screws (M4 × 50 mm).
-
The stamping on the surface mount adapter indicates the orientation of the microphone.
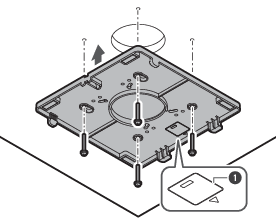
- Stamping indicating microphone orientation
-
-
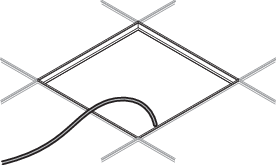
Run the cables inside the ceiling.
-
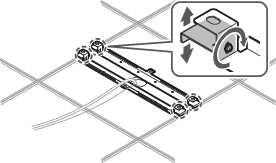
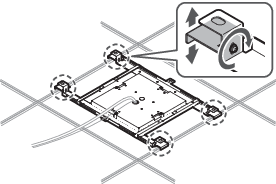
Attach the seismic cable to the ceiling frame.
-
Securely attach the seismic cable to a strong point on the ceiling frame.
-
Slide the unlock pins to release the lock for adjusting the wire.
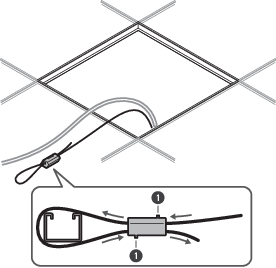
- Unlock pins

- Attach the seismic cable so that there is as little slack as possible.
- Using the seismic cable with a large amount of slack could increase the impact exerted were the microphone to be dropped and may result in an accident, injury, or damage to the microphone.
- If the impact from a fall is applied to the seismic cable, replace the cable with a new one.
-
-
Pass the cables and the seismic cable through the hole in the surface mount adapter and return the ceiling tile to its original location.
-
Adjust the tile bridge C assembly to the height of the ceiling frame and tighten the screws (M4 × 10 mm) to attach.
-
Securely attach tile bridges A and C to the ceiling frame so that a sufficient load can be supported.
-
If the placement of the ceiling frame makes it difficult to ensure a secure installation, use nuts and bolts to attach tile bridges A securely to the ceiling frame mounting holes.
Applicable bolt size for mounting holes of tile bridges A: W3/8 or M10
-
-
Attach the seismic cable to the microphone using the screw for seismic cable.
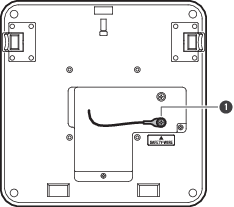
- Screw for seismic cable
-
Connect the wired cables to the microphone.
-
See Connection procedure for details on connecting the cables.
-
-
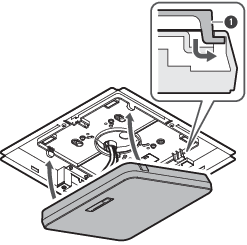
Pass the zip tie through the microphone and the surface mount adapter to attach the microphone to the surface mount adapter.
-
Make sure the tab on the surface mount adapter is securely hooked on the microphone before pushing up the other side of the microphone to attach it.
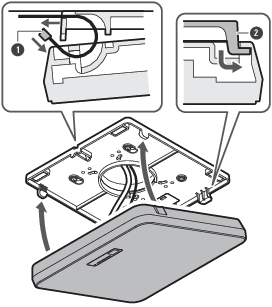
- Zip tie
- Tab on surface mount adapter
-
-
Tighten the zip tie to secure.
Flush mounting
Completed installation
Parts required for installation
-
Surface mount adapter
-
Flush mount adapter
-
Flush mount cover
-
Screw (M4 × 10 mm) × 12
-
Hole cover
-
Nut × 4
-
Snap bushing × 2
-
Tile bridge A × 2
-
Tile bridge B × 2
-
Tile bridge C × 4
-
Seismic cable
-
Safety belt
-
Installation template
-
Remove the ceiling tile where the microphone will be installed.
-
Cut out a square hole in the ceiling for attaching the microphone.
-
Use the enclosed installation template to cut out a mounting hole according to the specified dimensions.
-
Align the mounting holes with the center of the ceiling tile.
-
Max. ceiling tile thickness for installation: 25 mm
-
-
Attach tile bridges A and tile bridges B behind the ceiling tile using the screws (M4 × 10 mm).
Attach tile bridges C loosely to tile bridges A using the screws (M4 × 10 mm).-
Attach tile bridges A and B to the ceiling by aligning with the square hole cut into the ceiling tile.
-
-
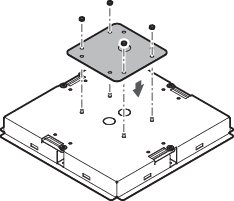
Attach the surface mount adapter to the flush mount adapter using the screws (M4 × 10 mm).
-
Align the arrows on both the flush mount adapter and the stamping on surface mount adapter when attaching.
-
-
Attach the hole cover with the nuts.
-
If using both holes, skip this step and proceed to the next step.
-
-
Attach the snap bushings.
-
Press your hand on the snap bushing from above to insert it into the wiring hole.
-
When wiring a large number of cables, attach both snap bushings without using the hole cover.

-
-
Insert the flush mount adapter into the square hole cut into the ceiling tile, and secure with screws to attach the flush mount adapter.
-
The stamping on the surface mount adapter indicates the orientation of the microphone.
-
Securely tighten the mounting screws when attaching the flush mount adapter.
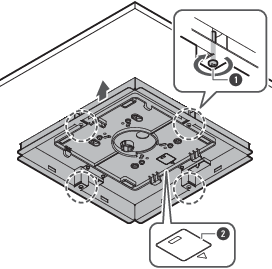
- Mounting screws
- Stamping indicating microphone orientation
-
-
Run the cables inside the ceiling.
-
Attach the seismic cable to the ceiling frame.
-
Securely attach the seismic cable to a strong point on the ceiling frame.
-
Slide the unlock pins to release the lock for adjusting the wire.
- Unlock pins
- Attach the seismic cable so that there is as little slack as possible.
- Using the seismic cable with a large amount of slack could increase the impact exerted were the microphone to be dropped and may result in an accident, injury, or damage to the microphone.
- If the impact from a fall is applied to the seismic cable, replace the cable with a new one.
-
-
Pass the cables and the seismic cable through the snap bushing hole in the flush mount adapter and return the ceiling tile to its original location.

-
Adjust the tile bridge C assembly to the height of the ceiling frame and tighten the screws (M4 × 10 mm) to attach.
-
Securely attach tile bridges A, B, and C to the ceiling frame so that a sufficient load can be supported.
-
If the placement of the ceiling frame makes it difficult to ensure a secure installation, use nuts and bolts to attach tile bridges A securely to the ceiling frame mounting holes.
Applicable bolt size for mounting holes of tile bridges A: W3/8 or M10
-
-
Attach the seismic cable to the microphone using the screw for seismic cable.
- Screw for seismic cable
-
Connect the wired cables to the microphone.
-
See Connection procedure for details on connecting the cables.
-
-
Attach the microphone to the surface mount adapter.
-
Make sure the tab on the surface mount adapter is securely hooked on the microphone before pushing up the other side of the microphone to attach it.
- Tab on surface mount adapter
-
-
Attach the safety belt by hooking it onto the flush mount adapter and flush mount cover.
-
Ensure the safety belt is attached in the correct orientation.
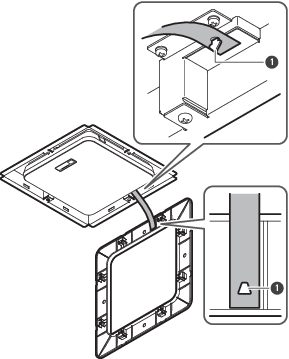
- Hooks for safety belt attachment
-
-
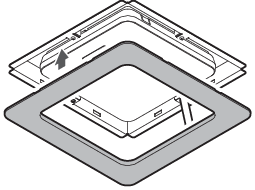
Attach the flush mount cover by inserting it into the flush mount adapter.
-
Avoid bending or twisting the safety belt when attaching the flush mount cover.
-