ATW-T1406/ATW-T1407
Turning the device on/off
To change the setting, see Setting the indicator lamp (ATW-T1406/ATW-T1407) under “Channel settings”.
-
With the device off, press and hold (approximately 2 seconds) the power button.
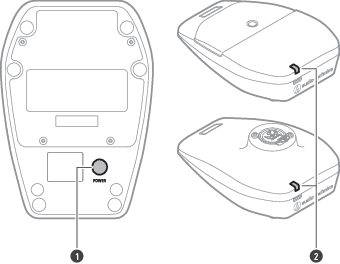
- Power button
- Indicator lamp
The device turns on and its indicator lamp lights.
Indicator lamp Status Lit in green Communication has been established. Flashing in red The device is searching for the receiver to communicate with. Lit in red Communication has been established (in Conference mode). -
With the device on, press and hold (approximately 2 seconds) the power button.
The device turns off.
Switching between muted and unmuted
- To change the setting, see Setting the mute mode (ATW-T1406/ATW-T1407) under “Channel settings”.
- To change the setting, see Setting the indicator lamp (ATW-T1406/ATW-T1407) under “Channel settings”.
-
Press the talk switch.
- For details on how to switch between muted and unmuted, see the set mute mode.
- The talk indicator lamp and status indicator lamp display the status.

- Talk switch
- Talk indicator lamp
- Status indicator lamp
Talk indicator lamp / status indicator lamp Status Lit in red Muted Lit in green Unmuted Off Muted (in Conference mode) Lit in red Unmuted (in Conference mode)
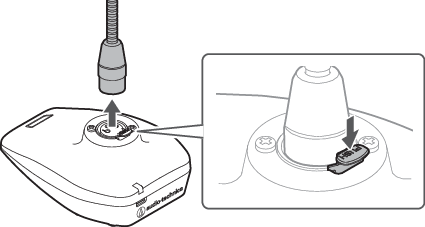
How to attach a gooseneck microphone (ATW-T1407 only)
To use a gooseneck microphone, attach it to a desk stand transmitter.
-
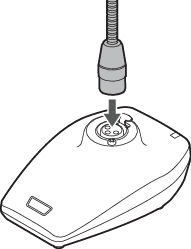
Insert the gooseneck microphone into the desk stand transmitter.
- Turn off the transmitter before inserting the microphone.
- Insert the microphone until it clicks.
|
|
|
|---|
When using a gooseneck microphone with an LED (ATW-T1407 only)
When using a gooseneck microphone with an LED, carry out the procedure under Setting the indicator lamp (ATW-T1406/ATW-T1407).
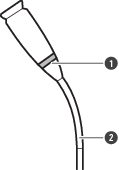
- LED
- Gooseneck microphone with an LED
How to remove a gooseneck microphone (ATW-T1407 only)
-
While pushing the part labeled “PUSH” on the desk stand transmitter, remove the microphone.
- Turn off the transmitter before removing the gooseneck microphone.